
Karin’s Vintage Treasures Projects
Hi everyone!
I am super thrilled to be here today to share five projects that I’ve made with the absolutely wonderful Vinatge Treasue Collection by Becca Feeken. I can never stop being fascinated by how dies work and the beautiful result that come out at the other end once you’ve rolled your die and cardstock through the diecutting machine. It’s a joy to work with the Vintage Treasure collection- So many beautiful dies and endless possibilities. If you want more info about this collection visit HERE

Project 1
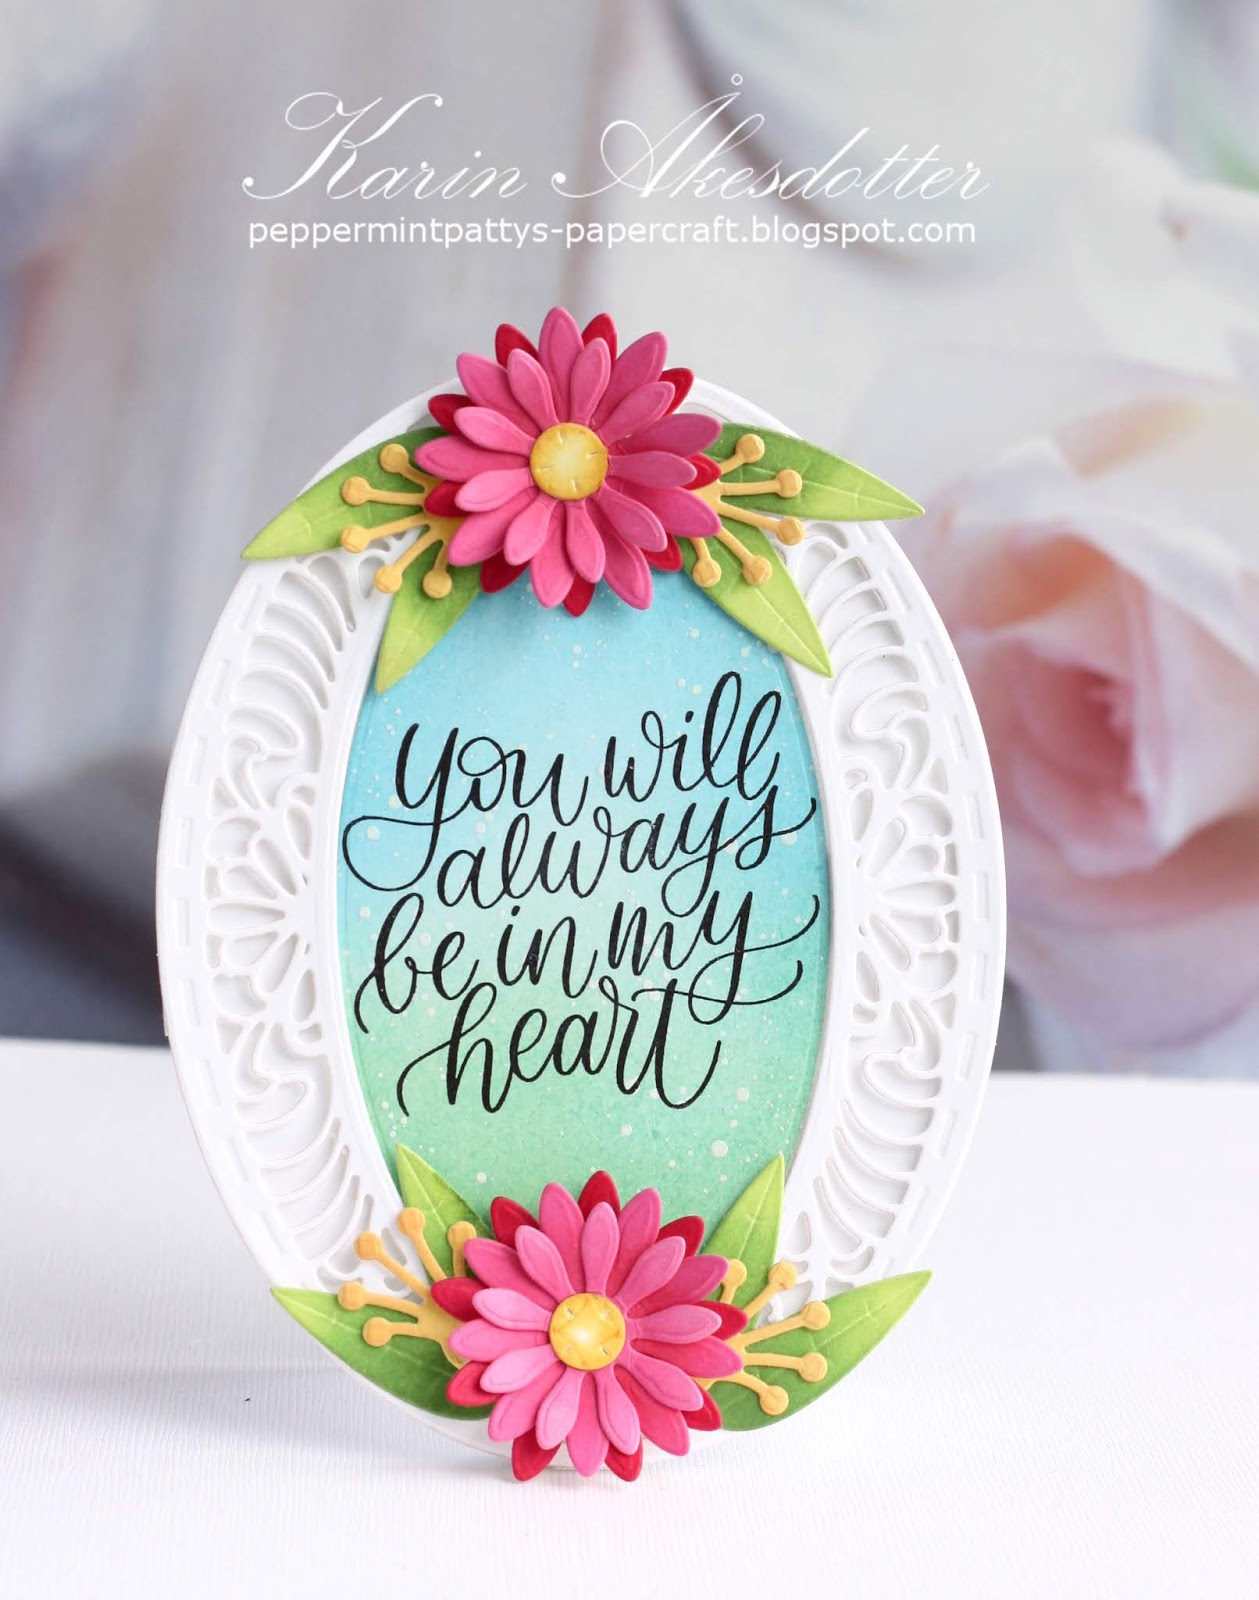
The first dies that caught my eyes were the beautiful
oval from Bella Luce Ovals
and the lovely flower dies in Cinch andGo. I
love that every intricate die come with and according solid background die – it
makes beautiful cardmaking so easy!
For this card I simply diecut the oval from white
cardstock and adhered it to the ovan bg using foam tape to get a bit of
dimension. I then diecut and inked the flowers from Cinch and Go V and
assembled them using glue dots. Bfore I adhered the flowers to the frame I
inked the leftover oval and stamped the sentiment to the center. Make sure your
inked bg is completely dry so the sentiment looks crisp when stamped. Attach
flowers.
Spellbinders
Supplies for this project:
S4-990 Bella Luce Ovals
S4-99 Cinch and Go V
Other:
Distress ink
Rangers Distress ink: Mowed lawn ,
Peacock Feathers, Tumbled Glass, Twisted Citron, Scattered Straw Picked Raspberries, Festive Berries,
Glue dots
Neenah solar white cardstock
SSS Love always stamp set


Project 2
For my next project I made a white card base and then
diecut the very beautiful Cannetille Rectangle from white cardstock. I lay out
the rectangle on the cardbase and stamped my sentiment to the center of the
cardbase before adhereing the lacey rectangles to it. I used foam adhesive and
used strips for the edges but larger pieces where I knew I was going to place
my flowers for extra stability.
I then diecut the flowers (they are from the Adorned
Notepad set) and colored them using copic markers and Chinese white (opaque)
watercolor. The leaves are made from the largest flower. I then adhered the
flowers with glue dots to create a little flower wreath around the sentiment.
Supplies for
this project:
S4-989 Cannetille Rectangle
S4-997 Adorned Notepad (blommor)
Other: Copic Markers
Chinese white (opaque) watercolor Winsor and Newton
Glue dots
Neenah solar white cardstock
SSS love always stamp set


Project 3
Project #3 was so fun to make, very simple and fast
but I just LOVE the resutlt. This will be a little mini Easter gift for family
and friends. I just diecut the pieces from Adorned Notepad and they are super
easy to assemble. Then you can decorate it any way you want. For my CAS version
I used beautiful paper from BoBunny and then the pretty lacey diamond shape
from Nobel Chatelaine.
To make my pencil match the set I simply glued on a
piece of the same patterned paper I hade used for the front panel decor.
S4-997 Adorned Notepad (blommor)
S4-394 Nobel Chatelaine
Other: Tombow adhesive tape
Patterned
paper: Bo Bunny Early Bird


Project 4 (pic 7+8)
My next project would make a pretty wedding or
anniversary card. I made a square cardbase from white card stock and then cut
another square piece slightly smaller than the base. I then cut the lovely Brillante
Rondelle through the center. I then remved the diecut and adhered a piece of
vellum to the back of the panel. It was then easy to attach the lacey rondell
back at the center of the square panel.
I then adhered the panel to the cardbase using foam
adhesive before adding the sweet cardstock images from the Spellbinders January
Card kit.
Last but not least I created som flowers (the same way
as for project # 2) to add even further beauty and dimension to the card.
S4-991 Brillante Rondelle
S4-997 Adorned Notepad (blommor)
Other: Copic Markers
Chinese white (opaque) watercolor Winsor and Newton
Glue dots
Neenah solar white cardstock
Spellbinders January Card kit

Project 5
I’m finishing off with a fast and easy card. I really
love the beautiful die cuts from the January kit and created a rectangle card
the same way as I did my first card. Make a cardbase from white cardstock and
adhere an inked panel to the base. I had spattered this one with Chinese white
(opaque) watercolor for a bit more interest. I then adhered my die cut frame to
the card with foam adhesive and last added some pretty die cuts from the
January kit. You can of course add any images, stamped or printed that you
like.
S4-989 Cannetille Rectangle
S4-394 Nobel Chatelaine
Spellbinders January Card kit
Other:
Cannetille Rectangle
Nobel Chatelaine
Chinese white (opaque) watercolor Winsor and Newton
Glue dots
Neenah solar white cardstock
Foam adhesive : Scotch
Rangers
Distress ink: Mowed lawn , Twisted
Citron, Scattered Straw
For more info visit my post on the Spellbinder blog here:
All
Spellbinders Poducts:
Spellbinders January Card Kit
Other products:
Distress ink
Rangers
Glue dots
Copic Markers
Neenah solar white cardstock
SSS Love always stamp set
Foam Adhesive
Chinese white (opaque) watercolor Winsor and Newton
Tombow adhesive tape
Patterned
paper: Bo Bunny Early Bird
Hope you are
inspired to make something beautiful with this collection – I have a bunch of
more cards in the making – I just couldn’t stop (-:
For more of
my projects please follow me on Instagram : https://www.instagram.com/peppermintpatty42/ or visit me at my blog: http://peppermintpattys-papercraft.blogspot.com/
Have a wonderful day, lots of love, Karin


Have a great day, hugs, Karin
5 comments:
Wowza Karin, you've been busy! These are all incredible!
What a beautiful collection of cards!
Oh my goodness, Karin! You've been delightfully busy. These projects are gorgeous. So romantic and beautiful. It's no wonder you couldn't stop. :) Thank you so much for sharing and inspiring!
Just couldn't be a prettier post today, Karin! LOve the little note card - you've done these products proudly!
=]
Gorgeous cards.
Post a Comment